Navigation menu
hello Guest

Administrator Manual
Enroll
Generate Access Code or Enroll
Click the Enroll tab and then click the Enroll button on green bar to generate access code or to enroll. Select the Bill Type, provide the Reference/PO Number, and Comment.
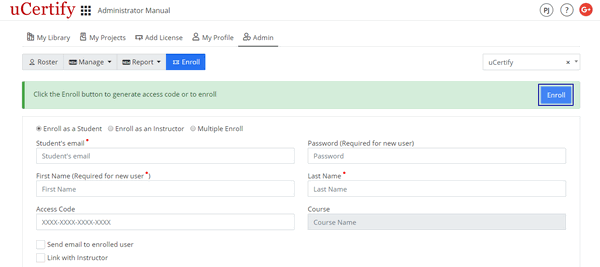
Figure 5.1: Enroll Page with Enroll Button
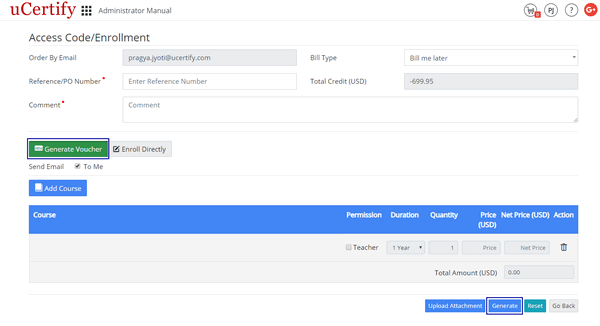
Figure 5.2: Generate Voucher tab with Generate button.
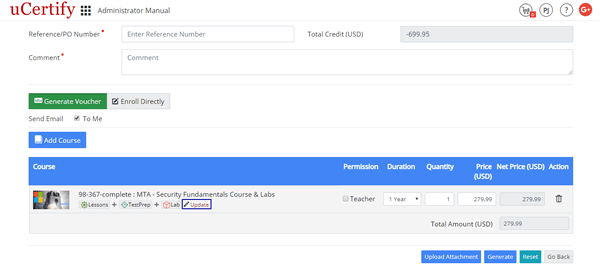
Figure 5.3: Generate Voucher Page with Update Link
The License Select modal box will open. Expand the Add-on Components section, select the additional license, and click the Update button.
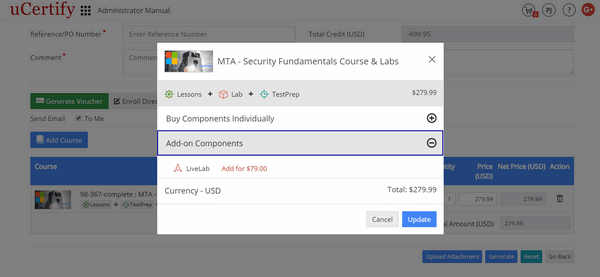
Figure 5.4: License Select Modal Box with Add-on Components Option
You can also select the individual license for the course. To do so, expand the Buy Components Individually section, select the individual license, and then click the Update button.
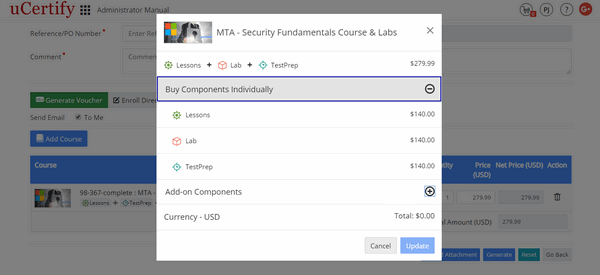
Figure 5.5: License Select Modal Box with Buy Components Individually Option
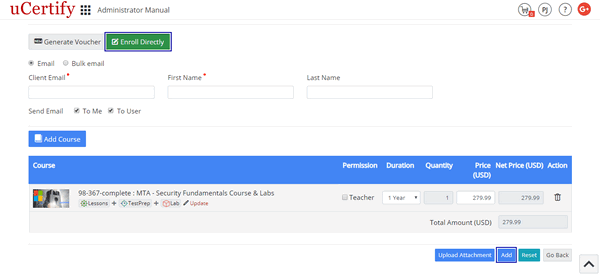
Figure 5.6: Enroll Directly Tab with Add Button
Figure 5.1: Enroll Page with Enroll Button
- Generate Voucher: Click the Add Course button. Check the desired courses and click the Save button to add course. Click the Generate button to generate voucher.
Figure 5.2: Generate Voucher tab with Generate button.
Figure 5.3: Generate Voucher Page with Update Link
The License Select modal box will open. Expand the Add-on Components section, select the additional license, and click the Update button.
Figure 5.4: License Select Modal Box with Add-on Components Option
You can also select the individual license for the course. To do so, expand the Buy Components Individually section, select the individual license, and then click the Update button.
Figure 5.5: License Select Modal Box with Buy Components Individually Option
- Enroll Directly: Click the Enroll Directly tab and select the Email button. Provide the Client Email, First Name, and Last Name. Click the Add Course button. Check the desired courses and click the Save button. Check the Teacher checkbox under the Permission heading if you are providing the user with instructor permission. Click the Add button to enroll the email in the course directly.
Select the Bulk Email button, provide Format Email id, First Name, Last Name (One user per line) in the box below the Bulk Email button, and click the Next button. Click the Add Course button to add the course and then click the Add Bulk button to enroll bulk email to the course directly.
Figure 5.6: Enroll Directly Tab with Add Button
Student
To enroll a student, click the Enroll tab, select the Enroll as a student option and provide the following details:
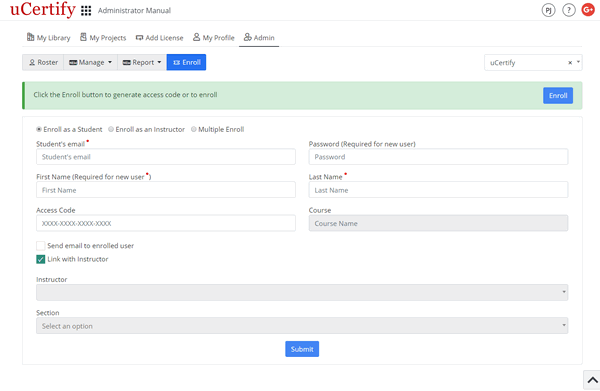
Figure 5.7: Enroll Page with Enroll as a Student Button
- Access code
- Password
- First Name
- Last Name
Figure 5.7: Enroll Page with Enroll as a Student Button
Instructor
To enroll an instructor, click the Enroll tab, select the Enroll as an instructor option and provide the following details:
If you are a new user, you are required to provide additional details:
Finally, click the Submit button.
You can create users with student or instructor permission in the same way as you enroll the student or the instructor. You can also enroll the student or the instructor without course. To do so, leave the Access Code option blank.
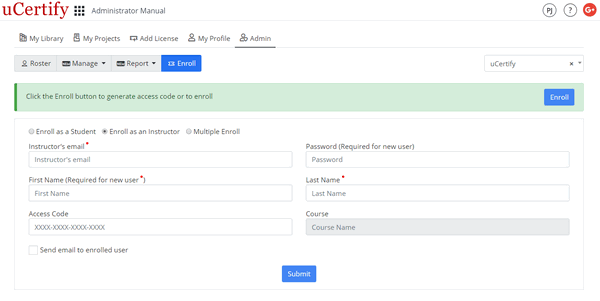
Figure 5.8: Enroll Page with Enroll as an Instructor Button
- Access code
If you are a new user, you are required to provide additional details:
- Password
- First Name
- Last Name
Finally, click the Submit button.
You can create users with student or instructor permission in the same way as you enroll the student or the instructor. You can also enroll the student or the instructor without course. To do so, leave the Access Code option blank.
Figure 5.8: Enroll Page with Enroll as an Instructor Button
Multiple Enroll
- To enroll multiple students under an instructor, select the Multiple Enroll option. Provide the details in the following format for enrolling multiple students at a time: Email id, First Name, Last Name, Password, Access Code (One user per line).
- You can link the students to an instructor. To do so, check the Link with instructor checkbox. Select the instructor, course, and section to which you want to enroll students. Finally, click the Next button.
- You can see the status of the emails which you want to enroll. Check all the checkboxes from the first column of the table and click the Enroll selected button.
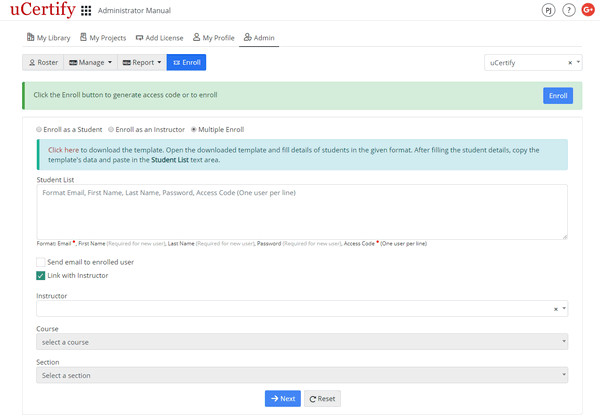
Figure 5.9: Enroll Page with Multiple Enroll Button