Navigation menu
hello Guest

Administrator Manual
Manage
Administrator List
Click the Manage tab and select the Administrator List option. The Administrators page will open. Now, define search criteria using "Advance Search" under the "Search" button or enter email/name of administrator in the search text box and click on the search icon to list Administrators. Administrators page will open with detailed information such as the name and email address of the Administrators of that org, their Organization, and Last Login.
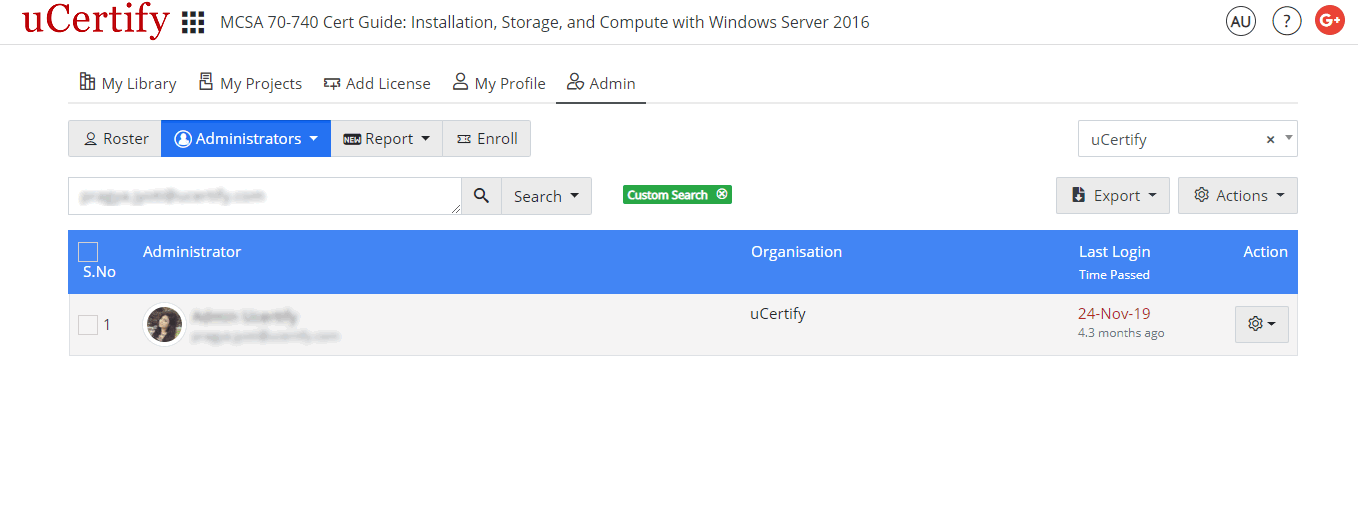
Figure 3.1: Administrators Page
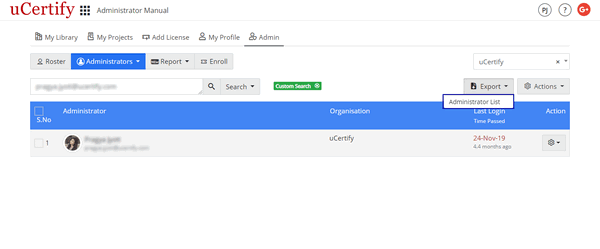
Figure 3.2: Export Menu of Administrators Page with Option
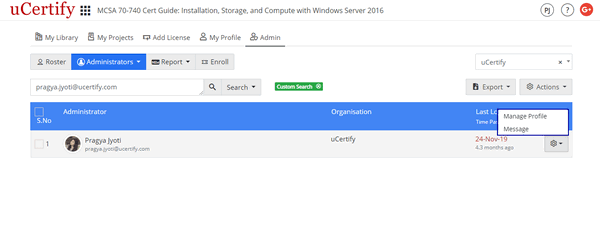
Figure 3.3: Settings Menu of Administrators Page with Options
- Export Button: To export the administrator list, click the Export button and select the Administrator List option.
Figure 3.2: Export Menu of Administrators Page with Option
- Settings Menu: To manage the administrator's profile or send message to him, click the settings menu parallel to the administrator name, and select the required option.
Figure 3.3: Settings Menu of Administrators Page with Options
Courses
Click the Manage tab and select the Courses option. The Courses page will open. You need to define search criteria using "Advance Search" under the "Search" button or enter email/name of instructor in the search text box and click on the search icon to list courses under that instructor. A list will open that contains the Course Name, Status, License Type, and Vendor.
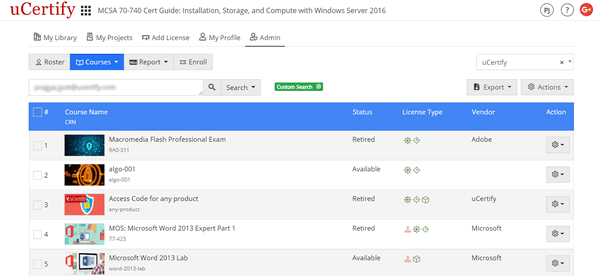
Figure 3.4: Courses Page
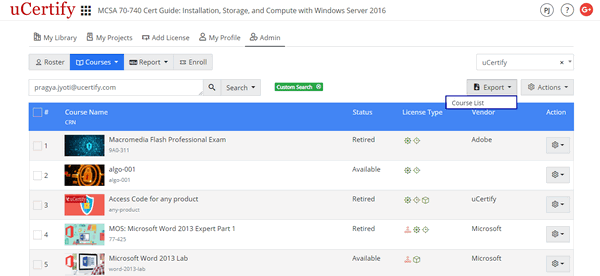
Figure 3.5: Export Menu of Courses Page with Option
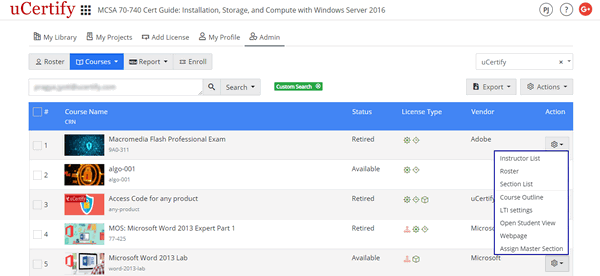
Figure 3.6: Settings Menu of Courses Page with Options
Figure 3.4: Courses Page
- Export: To export the course list, click the Export menu and select the Course List option.
Figure 3.5: Export Menu of Courses Page with Option
- Settings Menu: You can perform the following actions using the settings menu:
- Instructor List: To view the Instructor List of the desired course, click the settings menu parallel to the Course Name and select the Roster option.
- Roster: To view the roster of the course, click the settings menu parallel to the Course Name and select the Roster option.
- Section List: To view the section list of the course, click the settings menu parallel to the Course Name and select the Section List option.
- Course Outline: To view the course outline of the desired course, click the settings menu parallel to the Course Name and select the Course Outline option.
- LTI Settings: To create the LTI Link or Custom parameter of the course, click the Settings menu parallel to the Course Name and select the LTI settings option.
- Open Student View: To open the student view of the course, click the settings menu parallel to the Course Name and select the Open Student View option.
- Webpage: To view the webpage of the course, click the settings menu parallel to the Course Name and select the Webpage option.
- Assign Master Section: To assign section and instructor to the course, click the settings menu parallel to the Course Name and select the Assign Master Section option. The Assign Master Section modal box will open, select the instructor from the Instructor List drop-down and then click the Save button.
Figure 3.6: Settings Menu of Courses Page with Options
Sections
Click the Manage tab and select the Sections option. You need to define search criteria using "Advance Search" under the "Search" button or enter section name in the search text box and click on the search icon to list Sections. The Sections page provides you the view of the class data such as Class Name (Section Key), Course Name (CRN/License Type), Instructor, Created On (Days Passed), Starts On (Duration), End On (Days Required), and Enrollments.
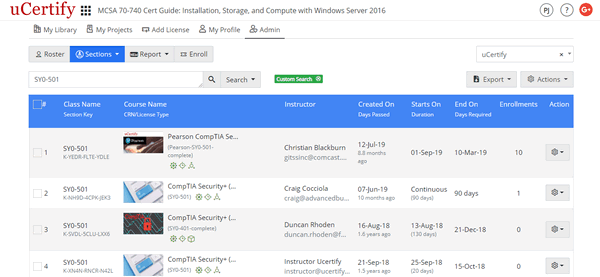
Figure 3.7: Sections Page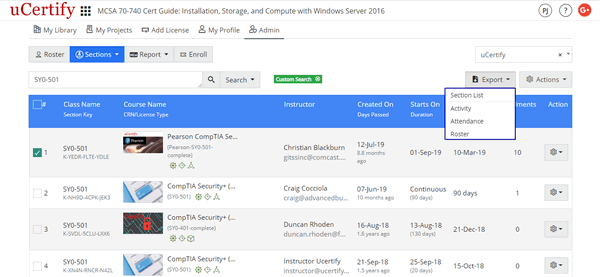
Figure 3.8: Export Menu of Sections Page with Options
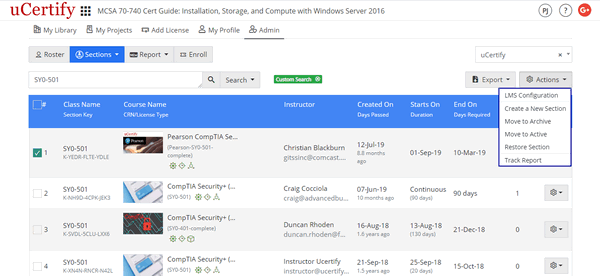
Figure 3.9: Actions Menu of Sections Page with Options
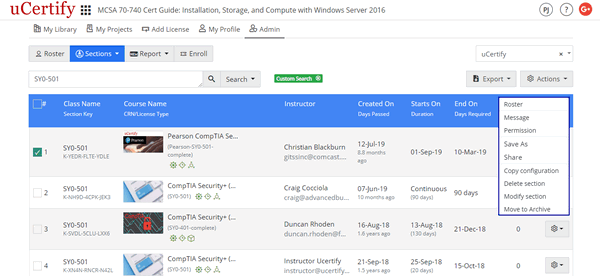
Figure 3.10: Settings Menu of Sections Page with Options
Figure 3.7: Sections Page
- Export: You can download the following using the Export menu:
- Section List: To download the section name and details, click the Export menu and select the Section List option.
- Roster: To download the Roster of a class, check the checkbox before the desired class, click the Export button, and select the Roster option. Click the Generate button to generate the report and finally click the Download button to download the report. Click the Generate button to generate the report and finally click the Download button to download the report.
- Activity: To download the activity of students of a class, check the checkbox before the desired class, click the Export button, and select the Activity option. Click the Generate button to generate the report and finally click the Download button to download the report.
- Attendance: To download the activity of students of a class, check the checkbox before the desired class, click the Export button, and select the Attendance option. Click the Generate button to generate the report and finally click the Download button to download the report.
Figure 3.8: Export Menu of Sections Page with Options
- Actions: You can perform the following things using the Actions menu:
- Create Section: To create a new section, click the Actions menu and select the Create a new section option. The New Section modal box will open. Select the desired instructor and course. If you want to create a new section or clone the previous section, select the desired option from the Create a New Section drop-down. Provide the Section Tag, Class Name, Start and End date, and Mastery Level. Click the Save and manage section button to create new section.
- Delete Section: To delete a desired section, check the checkbox before the Class Name. Click the Actions menu and select the Delete section option.
- Restore Section: To restore a desired section, check the checkbox before the Class Name. Click the Actions menu and select the Restore section option.
- Move to Archive: To archive a desired section, check the checkbox before the Class Name. Click the Actions menu and select the Move to archive option.
- Move to Active: To move a section to active, check the checkbox before the Class Name. Click the Actions menu and select the Move to active option.
- View and export Track Report: To view and export the track report of the desired course, check the checkbox parallel to the Course Name. Click the Actions menu and select the Track Report option.
Figure 3.9: Actions Menu of Sections Page with Options
- Settings Menu: You can perform the following actions using the settings menu:
- Roster: To view the roster of the class, click the settings menu parallel to the Class Name, and select the Roster option.
- Message: To send message to the instructor of the class, click the settings menu parallel to the Class Name, and select the Message option.
- Permission: To change the owner permission and teaching assistant of the class, click the settings menu parallel to the Class Name, and select the Permission option. Select the desired owner from the Owner drop-down and click the Add New button to add the teaching assistant. To delete the teaching assistant, click the settings menu parallel to the name of the teaching assistant, and select the Delete option. Click the Save button.
- Save As: To create the copy of the section, click the settings menu parallel to the Class Name, and select the Save As option. Provide the desired Section Tag and Class Name and click the Save button.
- Share: To share the section with other instructor, click the settings menu parallel to the Class Name, and select the Share option. Provide the required details and click the Share button.
- Copy configuration: To copy the configuration of the class, click the settings menu parallel to the Class Name, and select the Copy configuration option. Select the Cloning option from the option drop-down and provide the details accordingly. Click the Save and manage section button.
- Delete section: To delete the section, click the settings menu parallel to the Class Name, and select the Delete section option. Click the Yes button to confirm.
- Modify section: To modify the section, click the settings menu parallel to the Class Name, and select the Modify section option. Provide the required details and click the Save button.
- Move to archive: To archive the section, click the settings menu parallel to the Class Name, and select the Move to archive option. Click the Yes button to confirm.
Figure 3.10: Settings Menu of Sections Page with Options
Users
Click the Manage tab and select the Users option. The Users page will open. Now, define search criteria using "Advance Search" under the "Search" button or enter email/name in the search text box and click on the search icon to list Users (instructors). The user name or email address with the Last Login date will open.
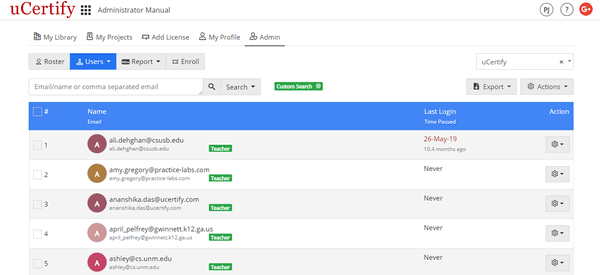
Figure 3.11: User Page
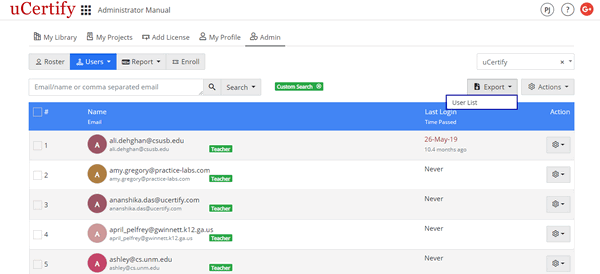
Figure 3.12: Export Menu of Users Page with User List Option
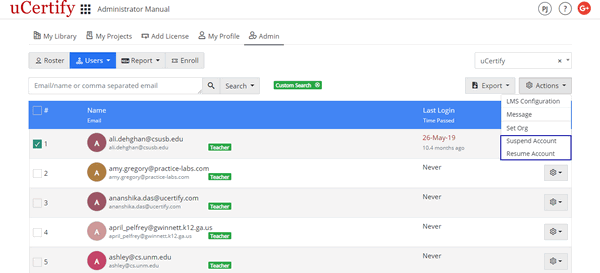
Figure 3.13: Actions Menu of Users Page with Suspend Account or Unsuspend Account Option
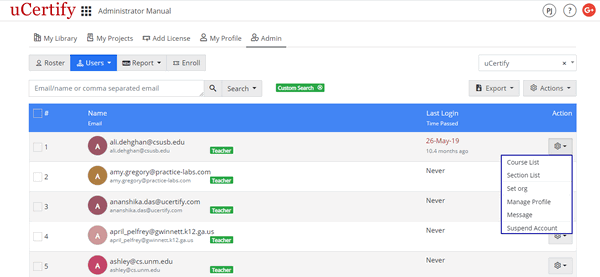
Figure 3.14: Settings Menu of Users Page with Options
Figure 3.11: User Page
- Export User List: Click the Export menu and select the User List option to export the user list.
Figure 3.12: Export Menu of Users Page with User List Option
- Suspend or Unsuspend Account: To suspend or unsuspend the user account, check the checkbox before the desired user's name or email address, click the Actions menu at the right corner, and select the desired option. Click the Yes button to confirm your action.
Figure 3.13: Actions Menu of Users Page with Suspend Account or Unsuspend Account Option
- Settings Menu: You can perform the following actions using the settings menu:
- View Course List: To view the course list under the desired user, click the settings menu, parallel to the user's name or email address and select the Course List option. The Course List page will open.
- Disable or Enable Courses: To disable or enable courses under the user, check the checkboxes before the desired Course Names, click the Actions menu at the right corner, and select the desired option.
- Section List: To view the section list of the desired course click the settings menu parallel to the Course Name, and select the Section List option.
- Roster: To view the roster of the desired course, click the settings menu parallel to the Course Name, and select the Roster option.
- Manage Profile: To set the profile information, change password, and send the reset password link, click the settings menu parallel to the Course Name, and select the Manage Profile option.
- Send Message: To send message to the user, click the settings menu parallel to the Course Name, and select the Message option.
- Disable Course: To disable desired course, click the settings menu parallel to the Course Name, and select the Disable course option.
- Section List: To view the section list under the desired user, click the settings menu parallel to the user's name or email address, and select the Section List option.
- Move to Org: To move the user to other org, click the settings menu parallel to the course and select the Set org option.
- Manage Profile: To set the profile information, change password, and send the reset password link, click the settings menu parallel to the user name or email address, and select the Manage Profile option.
- Send Message: To send message to the user, click the settings menu parallel to the course, and select the Message option.
- Suspend Account: To suspend the user account, check the checkbox before the desired user's name or email address, and select the Suspend Account option. Click the Yes button to confirm your action.
- View Course List: To view the course list under the desired user, click the settings menu, parallel to the user's name or email address and select the Course List option. The Course List page will open.
Figure 3.14: Settings Menu of Users Page with Options